Sometimes hosted build agents in VSTS dont cut the mustard and you want full control over your build environment. That’s where self hosted build agents come in. The problem is … do you don’t want to run VMs ideally and if you are getting into Kubernetes then your dev cluster is probably sitting there idle 90%+ of the time with all those CPU cycles being wasted.
We decided to do something with that extra capacity and run a set of VSTS linux build agents (good for Nodejs and .net Core builds etc…) in our dev AKS cluster! We can scale them up for more concurrent builds really easily.
What you will need:
- a working kubernetes cluster. (for AKS follow this guide)
- a VSTS account & a personal access token for your account
- kubectl and helm installed
Lets go …
Helm is a tool that helps you install apps in your kubernetes environment. Helm charts are templates for your application. They define what your app needs and what containers should be deployed etc… Fortunately Microsoft make their linux build agent available as a Docker image that we can use in a helm chart to get it deployed. https://hub.docker.com/r/microsoft/vsts-agent/
This means all we need to do is deploy it (or many of them) to Kubernetes … and helm charts can help with that! We wrote a basic one to get things going.
Setup
First you will need to get our helm chart.
git clone [email protected]:Hyperfish/vsts-build.git
Next open up the values.yaml file and update the following properties:
- VSTS_ACCOUNT – this is the name of your VSTS account e.g. “contoso”.
- VSTS_POOL – this is the name of the agent pool you would like your agents registered in.
- VSTS_TOKEN – this is your personal access token from VSTS that has been given at least the Agent Pools (read, manage) scope.
- replicaCount – set this to how many agents you want deployed.
Note: for more information about these see the vsts agent docker image documentation.
Deploy
Once you have updated the values.yaml file you are ready to deploy!
Ensure you are in the /vsts-agent folder and have kubectl connected to the kubernetes cluster you want to deploy the application to. (tip: run “kubectl cluster-info” to check you are connected)
Deploy the chart:
helm install .
Once complete the agent will be started in your kubernetes cluster.
helm ls
This will show you the apps you ahve deployed and you should see the vets-agent chart deployed.
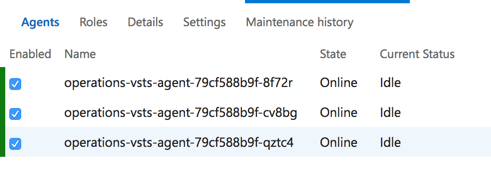
Check your VSTS build pool that you specified in the values.yaml file. You should see your new agents listed.

Troubleshooting:
If you don’t see them listed then its likely that the values you set are incorrect. You can check the logs of your agents using:
kubectl logs <pod name>
You might see something like “error: missing VSTS_ACCOUNT environment variable”
Summary
Kubernetes is a great way to deploy multiple vsts build agents! Deploying with a Helm chart is even nicer! It gives you are simple way to deploy and manage your agents in kubernetes.
Enjoy!
-CJ
CJ, great great stuff!
I love the show and keep on postin’!
Hey, nice article!
Tried to follow it and stuck on 1 problem:
when I run “kubectl logs” I get
Error from server (BadRequest): container “vsts-build-agent” in pod “knobby-tuatara-vsts-build-agent-74ff468dc-67vng” is waiting to start: ContainerCreating
And inside the kubernetes dashboard for this pod I see this error:
network is not ready: [runtime network not ready: NetworkReady=false reason:NetworkPluginNotReady message:docker: network plugin is not ready: Kubenet does not have netConfig. This is most likely due to lack of PodCIDR]
Any hints on how to fix it?
Thanks!