Category Archives: Cloud

Measuring cloud market share. A pet project.

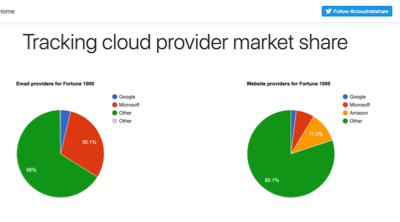
For a while I have had a desire to measure who is winning market share in the cloud. Microsoft vs. Google vs. Amazon vs. Others. I finally got some time over a few weekends to build an app to help me do that.

Here it is:
https://cloudmarketshare.com/

Underwhelming huh!

It’s pretty early days 🙂 I am no web developer that is clear! LOL. But the idea was to get something basic working and then go from there.

My goal is simple. Add data, detection techniques and interesting ways to visualize/slice and dice the data so that i can keep an eye on movements in market share. For now that just means some basic pie charts. But longer term I hope to add graphs showing historical data and trends that show movements over time. It’s currently keeping all that data but not showing it (my frontend web skills are weak).

In time I would like to add:

  • Authentication provider market share (e.g. Azure AD vs. Okta)
  • Top 1 million domain market share
  • Domain lookup with historical data
  • Productivity suite market share (e.g. O365 vs. GSuite)
  • Meeting solution market share (e.g. Teams vs. WebEx)
  • Information on other cloud software a company uses (e.g. Docusign vs. Adobe sign)
  • More … 😉

I have a whole raft of ideas, but time is really the limiting factor for implementing things.

How it works. I give it lists of domains that i want it to analyze and it goes of and analyzes them in a number of ways using DNS, IP addresses and a ranger of other detection techniques. It stores the results and does a bunch of stats aggregation. The app just shows this aggregated stats data.

It all runs in Microsoft Azure (of course) and consists of .Net core containers running in Azure Kubernetes Service and Azure Table Storage for keeping the data. I took inspiration from Troy Hunt and his post: Working with 154 million records on Azure Table Storage – the story of “Have I been pwned?” and tried to keep it cheap to run, fast and easy to maintain 🙂 It’s a side interest project after all.

I’m keen to hear what you would like to see from this. Follow and tweet @CloudMktShare with your ideas and suggestions.

-CJ

A simple joy of a managed AKS offering in Azure

A while back we moved to Azure Kubernetes Service for running the Hyperfish service. One of the advertised benefits we liked about AKS was that it was a managed service and that Microsoft would help us keep it in good working order. Late last week the value of this really hit home when I saw the following headline:

Kubernetes’ first major security hole discovered

It’s fair to say this freaked me out (significantly) and I immediately started to look into what we needed to do in order to secure our environments ASAP.

I went digging on twitter and found this very helpful gem from Gabe Monroy:

What a relief! I’m guessing that having people on the team who not only build and run AKS but also work on the Kubernetes project itself meant that Microsoft got the heads up about this vulnrability well before the CVE was published.

This is a fantastic example of why a managed service can help you running your applications with less manual effort. That said a managed service comes with a set of tradeoffs usually around flexilbity and control and so your particular requirments will dictate if you are able to take advantage of one.

Moving to Azure Kubernetes Service (AKS)

We recently moved our production service to the new Azure Kubernetes Service (AKS) from Microsoft. AKS is a managed Kubernetes (K8s) offering from Microsoft, which in this case, means Microsoft manage part of the cluster for you. With AKS you pay for your worker nodes, not your master nodes (and thus control plane) which is nice. 

Don’t know what Kubernetes is?

Kubernetes is an open-source system for automating deployment, scaling, and management of containerized applications. — https://kubernetes.io/

Why did we move

The short story is that we were forced to evaluate our options as the current orchestration software we were using to run our service was shutting down. Docker Cloud was a sass offering that offered capabilities around orchestration/management or our docker container based service. This meant we used it for deployment of new containers, rolling out updates, scheduling those containers on various nodes (VMs) and keeping an eye on it all. It was a very innovative offering 2 years ago when we started using it, was cloud based, easy to use and price competitive. Anyway, Docker with their new focus on making money the Enterprise decided to retire the product and we were forced to look elsewhere. 

Kubernetes was the obvious choice. It’s momentum in the industry means there are a plethora of tools, guidance, community and offerings around it. Our service was already being run in Docker containers and so didn’t require significant changes to run in Kubernetes. Our service is comprised of ~20 or so “services” e.g. frontend, API. Kubernetes helps you run these services. It offers things like scheduling those containers to run, managing spinning up new ones if they stop etc.

Every major cloud provider has a Kubernetes offering now. Googles GKE has been around since as early as Nov 2014 & Amazon’s AWS recently released their EKS (on June 2018).

Choosing AKS 

We are not a big team and we couldn’t afford to have a dedicated team to run our orchestration and management platform. We needed an offering that was run by Kubernetes experts who know the nitty gritty of running K8s. The team building AKS at Microsoft are those people. Lead by the co-founder of the Kubernetes project Brendan Burns the MS team know their stuff. It was compelling that they were looking at new approaches in the managed K8s space like not charging for the control plan/master nodes in a cluster and were set on having it just be vanilla K8s and not a weird fork with proprietary peculiarities. 

Summary of reasons (in no particular order):

  • Azure based. Our customers expect the security and trust that Microsoft offers. Plus we were already in Azure.
  • Managed offering. We didn’t want to have to run the cluster plumbing.
  • Cost. Solid price performance without master node costs.
  • Support. Backed by a team that know their stuff and offer support (more on this below).

AKS is relatively new and at the time we started considering our options for the move AKS was not a generally available service. We didn’t know when it would GA either.  This pained me to say the least, but we had a hunch it was coming soon. To mitigate this we investigated acs-engine which is a tool that AKS uses behind the scenes to generate ARM templates for Azure to stand up a K8s cluster. Our backup plan was to run our own K8s cluster for a while until AKS went GA. Fortunately we didn’t need to do this 🙂

Moving to Kubernetes

We were in the fortunate position that our service was already running in a set of Docker containers.  Tweaking these to run with Kubernetes only required minor changes. Those were all focused on supplying configuration to the containers. We used a naming convention for environment variables that wasn’t Kubernetes friendly, so we needed to tweak the way we read that configuration in our containers.

The major work required was in defining the “structure” of our application in Kubernetes configuration files. These files define the components in your application, the configuration of them, how they can be communicated with & resources they need. These files are just YAML files however manually building them can be tedious when you have quite a few to do. Also there can be repetition between them and keeping them in sync can be painful.

This is where Helm comes in.

Helm is the “package manager for Kubernetes” … but I prefer to think of it as a tool that helps you build templates (“charts”) of your application. 

In Azure speak they are like ARM templates for your application definition.

The great part about Helm is that it separates the definition of your application and the environmental specifics. For example, you build a chart for your application that might contain a definition for your frontend app and an API, what resources they need and the configuration they get e.g. DB connection string. But you don’t have to bake the connection string into your chart. That is supplied in an environment specific values file. This lets you define your application and then create environment specific values files for each environment you will deploy your application to e.g. test, stage, production etc. You can manage your chart in source control etc. and manage your environment specific values files (with secrets etc.) outside of source control in a safe location.

This means we can deploy our service on a developer laptop, AKS cluster in Azure for test or into Production using the exact same definition, but with different environment specific configuration.

Chart + Environment config == Full definition.

We already had a Docker Compose definition of our service that our engineers used to run the stack locally during development. We took this and translated it into a Helm chart. This took a bit of work as we were learning along the way, but the result is excellent. One definition of our service in a declarative, modular and configurable way that we use across development, test environments and production.

Helm charts are already available for loads of different applications too. This means if you want to run apps like redis, postgres or zookeeper you don’t have to build your own helm charts.

That’s a lot of words … what’s the pay off Chris?

The best way I can demonstrate in a blog post the value all this brings is to show you how simple it is to deploy our application.

Here are the CLI steps for deploying a brand new, fully functional 4 node environment in Azure with AKS + Helm for our application

az aks create –resource-group myCluster –name myCluster –admin-username cjadmin –dns-name-prefix appName –node-count 4 

helm upgrade myApp . -f values.yaml -f values.dev.yaml –install

Two commands to a fully functional environment, running on a 4 node K8s cluster in Azure. Not bad at all!! It takes us about 10 mins to spin up depending on how fast Azure is at provisioning nodes.

What didn’t go well

Of course there were things that didn’t go perfectly along with all this too.  Not specifically AKS related, but Azure related. One in particular that really pissed me off 🙂 During the production move we needed to move some static IP addresses around in our production environment. We started the move and it seemingly failed part the way through the move. This left our resource group in Azure locked for ~4 hours!! During this time we couldn’t update, edit or add anything to our resource group. We logged a Severity A support ticket with MS which is supposed to have a 1 hour response time … over 3 hours later we were still waiting. We couldn’t wait and needed to take mitigation steps which included spinning up a totally new and separate environment (easy with AKS!) and doing some hacky things with VMs and HAProxy to get traffic proxied correctly to it. Some of our customers whitelist our static IP addresses in their firewalls so we don’t have the luxury of a simple DNS change to point at a new environment. It was disappointing to say the least that we pay for a support contract from MS but Azure failed and more importantly our support with MS failed and left us high and dry for 4 hours.  PS: they still don’t know what happened, but are investigating it.

Summary

Docker closing it’s Docker Cloud offering was the motivation we needed to evaluate Kubernetes and other services. It left me with a bad taste in my mouth with Docker as a company and I will find it hard to recommend or trust taking a dependency on a product offering from them. Deprecating a SaaS product with 2 months notice is not the right way to operate a business if you are interested in keeping customers IMHO. But nevertheless a good thing for us ultimately!

Our experience moving to AKS has been nothing short of excellent. We are very glad the timing of AKS worked in our favor and that Microsoft have a great offering that meets our needs. It’s still early days with AKS and time will be the ultimate proof, however as of today we are very happy with the move.

If you are new to container based applications and are from a Microsoft development background I recommend checking out a short tutorial on ASP.Net + Docker. I have thoroughly enjoyed building a SaaS service that serves millions of users in a container based model and think many of the benefits it offers are worth considering for new projects.

If you want to learn Kubernetes in Azure I recommend their getting started tutorial. It’s will give you a basic understanding of K8s and how AKS works.

Try out the tutorial on AKS + Helm for deploying applications to get started on your journey to loving Helm.

Finally … I interviewed Gabe Monroy from the AKS team when I was at Build 2018 for the Microsoft Cloud show if you are interested in hearing more about AKS, the team behind it and Microsoft’s motivations for building it!

-CJ
SharePoint Conference North America thoughts and slide links

What a fun few days hanging out with friends and collegues in Las Vegas for the last few days. SPC NA seemed to go pretty well! I think the biggest thing for me this week was being surrounded by people who all share a common passion. That is what SPCs in the past were great at and i think some of that was rekindled this week. As always wandering the expo floor and talking with other vendors about what they are building is my favorite thing about conferences and this week was great for that. Some new faces popped up too!

For those looking for my slides from the session i did you can find them below. Unfortunatly there is a lot of content in the demos that isnt captured in the slides, but i hope it helps.

Office 365 development Slack

imageMany years back a small group of friends started the Office 365 developer slack network.  A bunch of people joined and then it rapidly went nowhere Smile
I think that is a crying shame. 

I recently joined a Slack network for Kubernetes and its a fantastic resource for asking people questions, working with others on issues you are having and generally learning and finding things.

Office 365 development has changed a lot over the years and people are finding new ways of doing things all the time. The Microsoft Graph is taking off in a HUGE way, SPfx is becoming a viable way to build on the SharePoint platform, Azure AD is the center of everything in the cloud for MS and the ecosystem is heating up with amazing new companies and products springing up.

Anyway … I miss having a Slack network for Office 365 development chats with people.

You can join the O365 Dev Slack here if you feel the same way …

http://officedevslack.azurewebsites.net/

-CJ

Importing and Exporting photos from Office 365 and Active Directory

Photos in Office 365 are a pain. This is because there are currently three(!) main places photos are stored in Office 365:

  • SharePoint Online (SPO
  • Exchange Online (EXO)
  • Azure Active Directory (AAD)

If you are syncing profiles using AD Connect those profiles are being synced into AAD. From there they take a rather arduous and rocky path to EXO and SPO via a number of intermediatary steps that may not work or may only complete after a period of time. e.g. from EXO to SPO photos may only sync if someones photo has not been set directly in SPO and a rather profile property attribute is not set correctly.

Needless to say it can be very hard to work out why you have one photo in AD on-prem, one in AAD, one in EXO and another in SPO … all potentially different!

At Hyperfish we built our product to push photos to all the places they should go when someone updates them. This means that when someone updates their photo and that update is appoved that it will be resized appropriately for each location and then saved into AD, EXO and SPO immediately. This results in the persons photo being the same everywhere at the same time. Happy place!

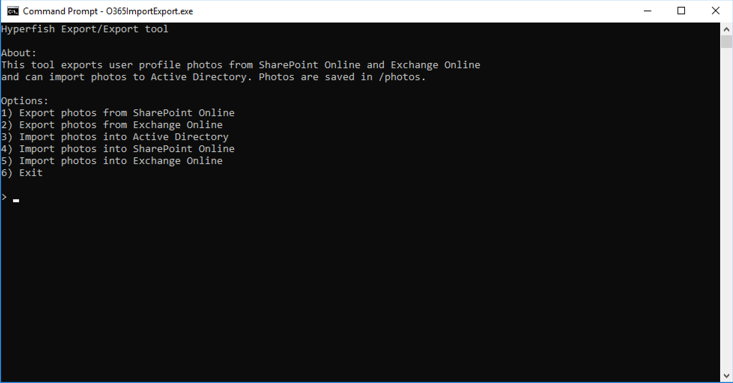
However, we have some customers who want to bulk move/copy photos around between these different systems to get things back in order all at once. To do this we created a helpful wee commandline utitility that we have published the source code for on GitHub and a precompiled release if you dont want to compile it yourself.

Photo Importer Exporter

Creative naming huh! 🙂

The Photo Importer Exporter is a very basic Windows command line utility that lets you:

  • Export photos from SharePoint Online
  • Export photos from Exchange Online
  • Import photos to Active Directory
  • Import photos to SharePoint Online
  • Import phtoso to Exchange Online

All you do is Export the photos from, say, Exchange Online (the highest resolution location) and it will download them all to the /photos directory. Then you can Import them to, say, Active Directory and the utility will resize them appropriately and save them to AD for you. Simple huh.

Code: https://github.com/Hyperfish/PhotoImporterExporter
Releases: https://github.com/Hyperfish/PhotoImporterExporter/releases

It’s a work in progress and we will be adding bits to it as we come accross other scenarios we want to support.

But for now you can grab the code and take a look, suggest additions, make pull requests if you like, log issues … or just use it 🙂

Happy coding,
-CJ

First look at Azure Container Service

In Episode 115 of the Microsoft Cloud Show we interviewed Ross Gardler from Microsoft about their new Azure Container Service which is currently in preview. I finally got some time a few weeks ago to play with ACS and thought I would share my first experiences here.  This is my 0 to first container experience.

Currently ACS allows you to provision 2 types of container service. Either a Mesos based deployment or a Swarm one. I hadn’t played with Meso much so opted to try that out.

Getting started

Note: I followed the getting started guide for deploying a new container service on the Azure website.

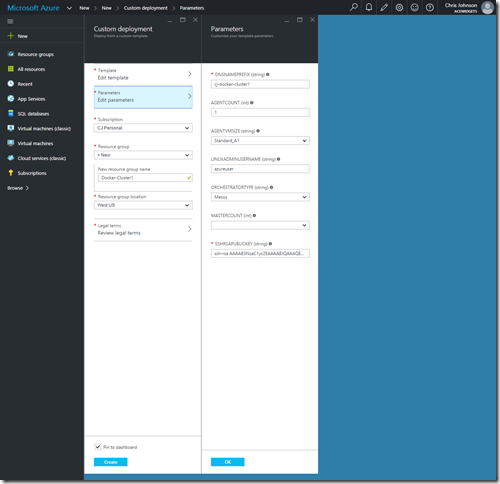
To get started its as simple as clicking a “Deploy to Azure” button on the pre-canned Azure template.   This will take you to your Azure management console where you can configure the various parameters for this template as shown below.

2016-02-20_16-10-37

You need to name your cluster, pick the VM size for the nodes you want to run and set authentication details.  The toughest part of this for most people will be generating the SSH keys as this is pretty foreign to many Windows folks.  But they provide a fairly simple walkthrough for you to create a key pair.

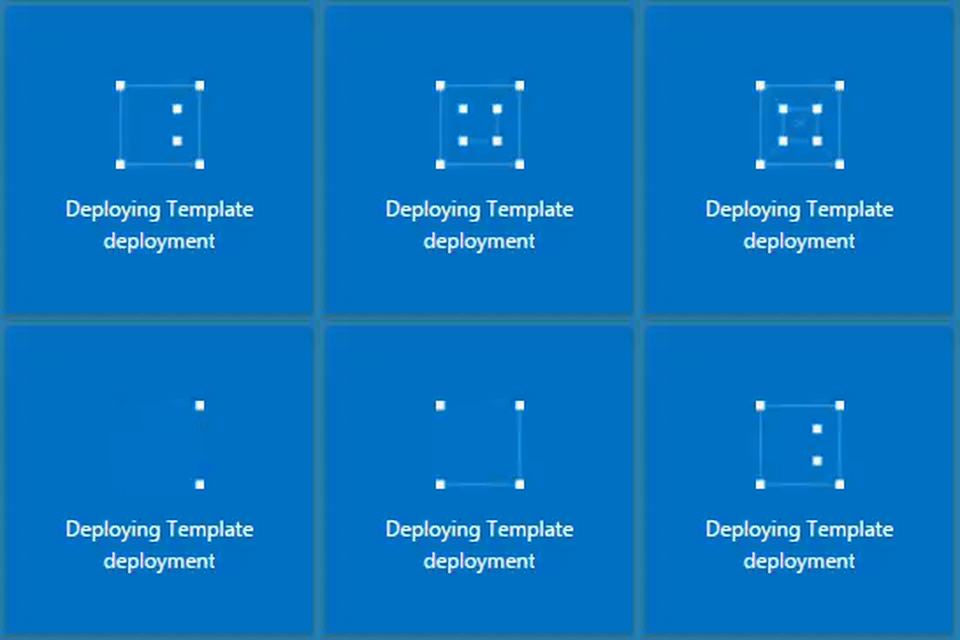
When complete you hit OK and go get a coffee while your cluster is deployed 🙂  It can take a while as it spins up a few machines and configures everything.

deploy

Note: I got an error “\”The subscription is not registered to use namespace ‘Microsoft.Compute’.” during deployment the first time.  I was deploying into a new MSDN Azure Subscription with free credit on it.  Turns out I needed to manually create a VM in this subscription first (any VM will do) before deployment of a template would work.  Once I had done this the template deployed fine.

I deployed a pretty simple cluster with 2 agent nodes and a mesos master node.  In Azure you can see all the resources the template created in a new resource group such as the VMs, networks and security groups etc…

2016-02-20_16-48-48

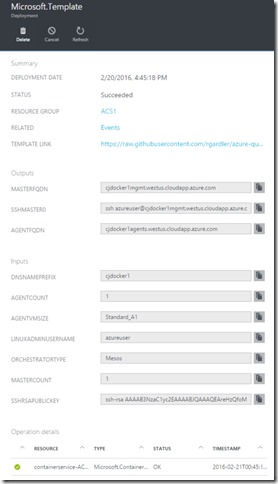
Now I had a cluster up and running I could log into Mesos.  To find the URL click “Succeeded” on the resource groups deployment status and click “Microsoft.Template”.  You should see a couple of fully qualified domain names.

2016-03-14_11-31-39

To actually hit Meso you need to create an SSH tunnel from your box into the cluster.  There is a decent write up on how to do this here.

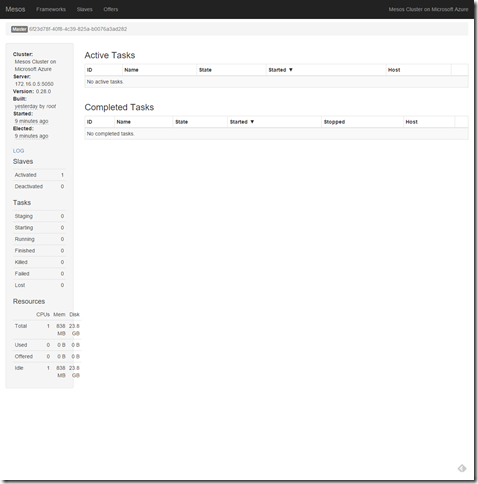
Once you have your SSH tunnel running you can hit the Mesos web interface on http://localhost/mesos/  (this is redirected over the SSH tunnel to your meso box running in Azure).

2016-02-21_10-22-35

Now you are ready to start running things!  Hit http://localhost/marathon/ to open the Marathon web UI which makes it pretty simple to run jobs on your cluster.

Click create and give it a name, 256MB and 1 instance.  Open the Docker container settings and specify “yeasy\simple-web” as the image name.  Then in the Optional Settings area set Port = 80.  This will map port 80 in the docker container to port 80 on the host. Create the app and let it spin up.  You should see it in the UI similar to this:

2016-02-21_10-25-17

Grab your load balancers fully qualified domain name from the Azure portal.  It’s the AGENTFQDN url in the deployment details you found earlier.

You should be able to hit that URL and see your simple website running!

Summary

This is obviously only the most basic thing you can do with a Meso based cluster running in Azure, but was my attempt and seeing how Azure are approaching the setup.  All in all it was surprisingly painless.

The goal of ACS right now so it make it simple to run a docker cluster in Azure using either Mesos or Swarm.  It doesn’t take away the need to manage that cluster in Azure once its deployed, so you will need people who know how to run a Mesos cluster and feed and water it appropriately.  Deployment is step one, but running it is a different beast all together from what I understand.  I am no expert in this area and so you will want to tread carefully and make sure you have the appropriate skills on staff to do this.

I for one would LOVE to see Azure also add as Container as a Service (CaaS) offering where you just specify how much compute you want, how much memory etc… and then have Azure spin up and manage a Docker cluster for you with the infrastructure being invisible.  This way you don’t need to be a Mesos master and you can let the pros run it for you.

I think CaaS is the final destination for Docker … just prior to everyone starting to espouse the virtues of true Platform as a Service (PaaS) and ditching this whole concept of apps running in containers and being aware of the OS at all.

When true CaaS comes to fruition, like it think it will in time, maybe Ray Ozzie (inventor of Azure, codename Red Dog) can all say “told ya so” about his vision of Platform as a Service being the ultimate destination for cloud computing (but being about 10 years too early).

Running apps using Docker Cloud (aka Tutum)

Anyone who has listen to me rant on about how interesting Docker is on the Microsoft Cloud Show may have caught me talking about Tutum.  

imageThe short story on Tutum is that it provides an easy to use management application over Virtual Machines that you want to run your apps on with Docker.  It is (sort of) cloud provider agnostic in that it supports Amazon Web Services, Microsoft Azure and Digital Ocean among others.

It was bought by Docker late last year and recently was recently re-released as Docker Cloud

What does it provide?

At a high level you still pay for your VMs wherever you host them, but Docker Cloud provides you management of them for 2c an hour (after your first free node) no matter how big or small they are.   You write your code, package it in a Docker Image as per usual and then use Docker Cloud to deploy containers based on those docker images to your Docker nodes. You can do this manually or have it triggered when you push your image to somewhere like Docker Hub as part of a continuous integration set up.

Once you have deployed your app (“Services” in Docker Cloud terminology) you can use it to monitor them, scale them, check logs, redeploy a newer version or turn them off etc…  They provide an easy to use Web App, REST APIs and a Command Line Interface (CLI).

So how easy is it really?

Getting going …

The first thing you have to do is connect to your cloud provider like Azure.  For Azure this means downloading a certificate from Docker Cloud and uploading it into your Azure subscription.  This lets Docker Cloud use the Azure APIs to manage things in your subscription for you. (details here)

Once you have done that you can start deploying Virtual Machines, “Nodes” in Docker Cloud terminology.  Below I’m creating a 2 node cluster of A2 size in the West US region of Azure. 

image

That’s it.  Click “Launch node cluster” wait a few mins (ok quite a few) and you have a functional Docker cluster up and running in Azure.

image

In Azure you can take a look at what Docker Cloud has created for you.  Note that as of the time of writing that Docker Cloud is provisioning “Classic” style VMs in Azure and not using the newer ARM model.  They also deploy different VMs into their own cloud services and resource groups which isn’t good for production.  That said, Docker Cloud let you Bring Your Own Node (BYON) which lets you provision the VMs however you like, install the Docker Cloud agent on them and then register them in Docker Cloud.  Using this you can deploy your VMs using ARM in Azure and configure them however you like.

image

Deploy stuff …

Now you have a node or two ready you can start deploying your apps to them!  Before you do this you obviously need to write your app … or use something simple like a pre-canned demo Docker Image to test things out.

Docker Cloud makes this really simple through “Services”.  You create a new service, tell it where it should pull the Docker Image from and a few other configuration options like Ports to map etc… Then Create and your containers will be deployed to your nodes.

Try this once you have your nodes up and running.  Click Services in the top nav,  then Create Service. Under Jumpstarts & Miscellaneous category you should see the “dockercloud/hello-world” image. Select it and then set it up like this:

image

There are only a two things I changed from the default setup.

  1. I moved the slider to 2 in order to deploy 2 containers
  2. Mapped Port 80 of the container to Port 80 of the node and clicked Published.  This maps port 80 of the VM to port 80 of the container running on it so that we can hit it with a web browser.
  3. High availability in the deployment strategy.  This will ensure that the containers are spread across available nodes vs. both on one.

Click “Create and deploy” and you should see your containers starting up.   Pretty simple huh!

image

Note: There is obviously a lot more available via configuration for things like environment variables and volume management for data that you will eventually need to learn about as you develop and deploy apps using Docker.

Once your containers are deployed you will see them move to the running state:

image

Now you have two hello world containers running on your nodes.  If you go back to your list of Nodes you should see 1 container running on each:

image

I want to see the good man!

You can test your hello world app out by hitting its endpoint.  You can find out what that is under the Service you created in the Endpoints information.

image

  1. This is the service endpoint.  It will use DNS round robin to direct requests between your two running containers.
  2. These are the individual endpoints for each container.  You can hit each one independently.

Try it out!  Open the URL provided in a browser and you should see something like this:

image

Note that #1 will indicate what container you are hitting.

Want more containers?  Go into your Service and move the slider and hit apply.

image

You will get an error like this:

image

This is because we mapped port 80 of the Node to the Container and you can only do that mapping once per Node/VM. i.e. two containers cant both be listening on port 80.  So unless you use a HAProxy or similar to load balance your containers you will be limited to one container on each node mapped to port 80.  I might write up another post about how to do this better using HAProxy.

Automate all the things …

We are a small company and we want to automate things as much as possible to reduce the manual effort required for mundane tasks.  We have opted to use Docker Cloud for helping us deploy containers to Azure as part of our continuous integration and continuous deployment pipeline.

In a nutshell when a developer commits code it goes through the following pipeline and automatically is deployed to our staging environment:

  1. Code is committed to GitHub
  2. Travis-CI.com is notified and it pulls the code and builds it.  Once built it creates a Docker Image and pushes it to Docker Hub.
  3. Docker Cloud is triggered by a new image.  It picks it up and redeploys that Service using the new version of the image.

This way a few minutes after a developers commits code the app has been built and deployed seamlessly into Azure for us.  We have a Big Dev Ops Flashing Thing hanging on the wall telling us how the build is going.

Cool … what else …

At Hyperfish we have been using Tutum for a while during its preview period with what I think is great success.  Sure, there have been issues during the preview, but on the whole I think it has saved us a TON of time and effort setting up and configuring docker environments.  Hell I am a developer kinda guy, not much of a infrastructure one and I managed to get it working easily which I think is really saying something 🙂

Is this how you will run production?

Not 100% sure to be honest.  It is certainly a fantastic tool that helps you run your apps easily and quickly.  But there is a nagging sensation in the back of my head that it is yet another service dependency that will have its share of downtime and issues and that might complicate things.  But I guess you could say that about any additional bit of technology you introduce and take a dependency on. That said, traffic to and from your apps is not going through Docker Cloud, traffic goes direct to your nodes in Azure so if they have brief downtime your app should continue to run just fine.

I have said that for the size we currently are and with the team focusing on building product that we might consider something else only once we can do a better job that it does for us.

We might consider something else only once we can do a better job that it does for us.

All in all I think Docker Cloud has a lot of great things to offer.   It will be interesting to compare and contrast these with the likes of Azure’s new service, Azure Container Service (ACS) as it matures and approaches General Availability.  It’s definitely something we will look at also.

-CJ

Sandbox code is “deprecated”, long live the Sandbox

we have deprecated the use of custom managed code within the sandboxed solution – Brian Jones, Principal Program Manager, Apps for SharePoint

It’s been a long time coming and widely anticipated that this announcement would come at some point.  It’s great to see the announcement and the clarity many have been asking for.

I feel like I’m in a good position to comment on this and give some background about why I think deprecating code based sandbox solutions is good idea. I was on the SharePoint engineering team when the sandbox was being built and for a period of time I was the Program Manager for the feature.

Background:  Sandbox solutions in SharePoint were introduced in SharePoint 2010.  They allowed a packaged set of assets and code to the uploaded to a SharePoint site.  That can consist of declarative components like XML for adding things like List Templates, as well as compiled code for things like Web Parts or Event Receivers.

When the Sandbox was being designed and built it was about 2 – 3 years prior to SharePoint 2010 being released. Azure, and cloud computing in general, either didn’t exist or was in its infancy. SharePoint needed a way to upload customizations/components to SharePoint sites where the administrators were not comfortable with installing Farm Solutions aka. Full trust solutions. Microsoft itself was a perfect example of this.  If I built a web part I, as a Microsoft employee at the time, couldn’t load that onto our SharePoint sites that MS IT ran.  No 3rd party web parts or products. This was a common problem in many large organizations and we heard about this time and time again with customers.

Sandbox Solutions were the answer. They allowed users to upload a solution and have SharePoint run it while it being controlled, secured and run in a sandboxed process. The main thing this gave SharePoint was the ability to isolate the code in that solution and ensuring that if it crashed or was badly behaved that it didn’t break the rest of the SharePoint environment.

The problem was that Sandbox Solutions was a feature added in Windows SharePoint Services (WSS) and that was a different product from SharePoint Portal Server (SPS) that built on top of WSS.  The API set in the Sandbox that was available was limited to WSS APIs and even then only a subset of them. There were good reasons for this, but at the end of the day it was very limiting for people.  Ideally it would have been great to have lots of SPS APIs available too. But that didn’t happen (different story).

So that is the background about how/why Sandbox came about.

… now fast forward to today …

In a nutshell the Sandbox was a good solution to the problem faced when it was designed. However, it’s not a great solution to the problem given the technology we have today.

Why is it no good today you ask?

A lot happened after the Sandbox was designed and built.  Cloud computing took off, new advances in code in all sorts of places got easier e.g. isolated apps on a phone.  A lot was learnt. 

In short its my belief that SharePoint shouldn’t have been trying to replicate an isolated code hosting environment.  That is reinventing the wheel and there are other teams at MS who build products to do this extremely well already.  Namely IIS and Azure.

Think about that for a second.  Imagine being given some arbitrary code and told to run it, but doing it in a way that was safe, secure, manageable and fault tolerant.  It’s actually quite a tough challenge. If you say it’s easy then you should try doing it instead of talking about it 🙂 (tip with wider life applicability too)

So today MS clarified that SharePoint was getting out of the code hosting game.  Why?  Because it was limited and there are better solutions to this problem today. 

The new SharePoint app model is designed to solve this by moving “sandbox” code to an alternative host e.g. IIS or Azure or <insert thing that runs code here>.

Sandbox code might be “dead”, but the new app model IS the new Sandbox!

I see the reasons why the sandbox came about the same as I do for the new app model.  They are solving the same problem.  How do you allow someone to customize, extend and build new things on SharePoint without compromising the integrity of SharePoint itself?  That is the goal.

Today in SharePoint 2013 and Office 365 we have the ability to build solutions that use this new app model.  Sure, it’s not perfect in the APIs it provides and there is plenty of scope for adding things.  I am certain it will evolve to cater for more of these things over time.  That said, it is MUCH better suited for the long term.  I for one am loving the ability to use all the latest dev tools and technologies in Azure that were not possible in SharePoint previously.

The app model may not be applicable or possible to be used for everyone today and that is fine. It’s going to develop and that will change over time would be what I bet on.  But it is the right path moving forward.  This might cause some pain for people in the short term and I understand the frustration people have with changes like this. But I would MUCH rather have to deal with this change than be limited to a inferior set of capabilities in the longer term.  This is the right move long term (in my humble opinion).  Short term pain, long term gain.

Getting SharePoint out of the code hosting solution was the right things to do and I applaud the team for clarifying there position on this.

I look forward to the SharePoint Conference in March where hopefully (fingers crossed) we will hear more about the future of the new app model and how it will address its shortfalls today.

-CJ